I set up a x86_64 ArchLinux chroot with the main packages:
base-devel
xfce4
xfce4-goodies
I then used mksquashfs with zstd compression with differing options as I wanted to see if there was a more ideal way to run mksquashfs.
The options I used were (in a Bash shell):
time mksquashfs chroot chroot_zstd_default.sqfs -comp zstd
time mksquashfs chroot chroot_zstd_l20.sqfs -comp zstd -Xcompression-level 20
time mksquashfs chroot chroot_zstd_l22.sqfs -comp zstd -Xcompression-level 22
time mksquashfs chroot chroot_zstd_ldef_b32k.sqfs -comp zstd -b $((32 * 1024))
time mksquashfs chroot chroot_zstd_l20_b32k.sqfs -comp zstd -Xcompression-level 20 -b $((32 * 1024))
time mksquashfs chroot chroot_zstd_l22_b32k.sqfs -comp zstd -Xcompression-level 22 -b $((32 * 1024))
The results:
736.234 MiB 771997696 Bytes May  2 17:50 chroot_zstd_l22.sqfs 241.150s
736.266 MiB 772030464 Bytes May  2 17:55 chroot_zstd_l20.sqfs 210.096s
741.141 MiB 777142272 Bytes May  2 17:45 chroot_zstd_default.sqfs 67.078s
781.422 MiB 819380224 Bytes May  2 18:01 chroot_zstd_l22_b32k.sqfs 191.463s
781.438 MiB 819396608 Bytes May  2 18:05 chroot_zstd_l20_b32k.sqfs 171.800s
787.645 MiB 825905152 Bytes May  2 17:57 chroot_zstd_ldef_b32k.sqfs 51.588s
Results sorted by time:
51.588s chroot_zstd_ldef_b32k.sqfs 825905152
67.078s chroot_zstd_default.sqfs 777142272
171.800s chroot_zstd_l20_b32k.sqfs 819396608
191.463s chroot_zstd_l22_b32k.sqfs 819380224
210.096s chroot_zstd_l20.sqfs 772030464
241.150s chroot_zstd_l22.sqfs 771997696
From these results, it appears that the default settings for zstd compression with mksquashfs is pretty sane, and I probably will keep to it.
Revisiting the benchmark
I created an x86_64 chroot again because I wanted to do more tests.
On ArchLinux, used mkarchroot chroot base-devel xfce4 xfce4-goodies.
du -sh shows the size of the chroot as 1.8G .
(Note that by default mksquashfs uses a compression level of 15 for zstd, and a block size of 128KiB.)
The options used:
time mksquashfs chroot chroot_default.sqfs -comp zstd
time mksquashfs chroot chroot_ldef_b32k.sqfs -comp zstd -b $((32 * 1024))
time mksquashfs chroot chroot_ldef_b256k.sqfs -comp zstd -b $((256 * 1024))
time mksquashfs chroot chroot_ldef_b512k.sqfs -comp zstd -b $((512 * 1024))
time mksquashfs chroot chroot_ldef_b1m.sqfs -comp zstd -b $((1024 * 1024))
time mksquashfs chroot chroot_l20_bdef.sqfs -comp zstd -Xcompression-level 20
time mksquashfs chroot chroot_l20_b32k.sqfs -comp zstd -Xcompression-level 20 -b $((32 * 1024))
time mksquashfs chroot chroot_l20_b256k.sqfs -comp zstd -Xcompression-level 20 -b $((256 * 1024))
time mksquashfs chroot chroot_l20_b512k.sqfs -comp zstd -Xcompression-level 20 -b $((512 * 1024))
time mksquashfs chroot chroot_l20_b1m.sqfs -comp zstd -Xcompression-level 20 -b $((1024 * 1024))
time mksquashfs chroot chroot_l22_bdef.sqfs -comp zstd -Xcompression-level 22
time mksquashfs chroot chroot_l22_b32k.sqfs -comp zstd -Xcompression-level 22 -b $((32 * 1024))
time mksquashfs chroot chroot_l22_b256k.sqfs -comp zstd -Xcompression-level 22 -b $((256 * 1024))
time mksquashfs chroot chroot_l22_b512k.sqfs -comp zstd -Xcompression-level 22 -b $((512 * 1024))
time mksquashfs chroot chroot_l22_b1m.sqfs -comp zstd -Xcompression-level 22 -b $((1024 * 1024))
The results sorted by resulting file size:
433.934 MiB 455012352 Bytes 02:35.663 chroot_l22_b1m.sqfs
434.055 MiB 455139328 Bytes 02:04.382 chroot_l20_b1m.sqfs
444.102 MiB 465674240 Bytes 02:36.925 chroot_l22_b512k.sqfs
444.211 MiB 465788928 Bytes 02:06.067 chroot_l20_b512k.sqfs
456.980 MiB 479178752 Bytes 02:49.903 chroot_l22_b256k.sqfs
457.004 MiB 479203328 Bytes 02:39.195 chroot_l20_b256k.sqfs
463.270 MiB 485773312 Bytes 01:01.794 chroot_ldef_b256k.sqfs
471.898 MiB 494821376 Bytes 03:33.590 chroot_l22_bdef.sqfs
471.941 MiB 494866432 Bytes 03:06.594 chroot_l20_bdef.sqfs
474.711 MiB 497770496 Bytes 00:36.037 chroot_ldef_b1m.sqfs
478.460 MiB 501702656 Bytes 00:57.119 chroot_default.sqfs
485.387 MiB 508964864 Bytes 00:31.380 chroot_ldef_b512k.sqfs
512.133 MiB 537010176 Bytes 02:49.632 chroot_l22_b32k.sqfs
512.152 MiB 537030656 Bytes 02:33.842 chroot_l20_b32k.sqfs
520.066 MiB 545329152 Bytes 00:45.010 chroot_ldef_b32k.sqfs
The results sorted by time spent:
00:31.380 485.387 MiB 508964864 Bytes chroot_ldef_b512k.sqfs
00:36.037 474.711 MiB 497770496 Bytes chroot_ldef_b1m.sqfs
00:45.010 520.066 MiB 545329152 Bytes chroot_ldef_b32k.sqfs
00:57.119 478.460 MiB 501702656 Bytes chroot_default.sqfs
01:01.794 463.270 MiB 485773312 Bytes chroot_ldef_b256k.sqfs
02:04.382 434.055 MiB 455139328 Bytes chroot_l20_b1m.sqfs
02:06.067 444.211 MiB 465788928 Bytes chroot_l20_b512k.sqfs
02:33.842 512.152 MiB 537030656 Bytes chroot_l20_b32k.sqfs
02:35.663 433.934 MiB 455012352 Bytes chroot_l22_b1m.sqfs
02:36.925 444.102 MiB 465674240 Bytes chroot_l22_b512k.sqfs
02:39.195 457.004 MiB 479203328 Bytes chroot_l20_b256k.sqfs
02:49.632 512.133 MiB 537010176 Bytes chroot_l22_b32k.sqfs
02:49.903 456.980 MiB 479178752 Bytes chroot_l22_b256k.sqfs
03:06.594 471.941 MiB 494866432 Bytes chroot_l20_bdef.sqfs
03:33.590 471.898 MiB 494821376 Bytes chroot_l22_bdef.sqfs
I find these results interesting as larger block-size does not necessarily mean slower compression. For a reasonable compression, using default compression level with block-size of 1 MiB looks good. For the best compression, level 22 with block-size of 1 MiB isn't that bad considering the runtime.
I usually use NeoVim when programming, and have a minimal setup. LSP is kind of quirky but it works.
I've recently started using the Helix editor and despite the different key-bindings, I was able to get the hang of it. There are notable differences even if some keybindings are similar (like ":w" to save and ":q" to quit). But there are some differences I end up having to use NeoVim to do the same thing for. Take for example, search and replace:
Helix has the user select (with regex) every instance of the text at once, and then edits them all simultaneously. NeoVim can also replace simultaneously, but also conditionally per instance via the use of regular expressions. The workflow is different as seen above, so in a large file, I prefer the per-instance replacement. Also, NeoVim's usage of regular expressions allows for replacement with regex groups, making it easier to replace text that has different components.
It was pretty difficult learning Helix and remembering the different keybindings between NeoVim and Helix, but Helix's built-in support for LSP in a lot of contexts makes it pretty useful, and it provides a lot of features that NeoVim may require plugins for. They both provide a ":tutor" mode, which is nice for a quick reference, but for some more extra config/keybindings, it becomes necessary to look up the Helix user docs.
TL;DR: Using Helix after using Vim for so long can be very painful, but having another editor to use with its own advantages is pretty nice.
Background
I'm still a student at age 30. There was a gap between my starting a masters program in Computer Science and me graduating with a Bachelors of Science in Computer Science back in 2014-ish. The gap was me getting a job, and quitting soon after due to health reasons. And then I moved to another country (but that's a story for another day). In between working on courses at my own pace, I dabbled in many different interests. Sometimes attending game jams, sometimes making prototypes for a game(s) that never ended up getting finished. And sometimes contributing to an open source project (in this case, two).
Background for implementing a filter for FFMpeg
One of the last few courses I took in my undergrad years was a photography class (two of them actually), and I discovered that pictures taken from a DSLR may not be "corrected". The type of lens you use causes an aberration on the resulting raw image which some cameras correct for you. Otherwise, you would need to depend on software to correct the image. Take for example a fish-eye lens. With such a wide view, things in the corners of the image seem warped in the raw image. Applying correction results in an image that is usually no longer rectangular (and may lose quality closer to the edges) but is now corrected to be viewed as if there were no strange lens-based artifacts. You can see examples of this like in more recent automobiles where the side/rear-view camera views on the dashboard can be viewed in a "natural" way, only because lens correction was applied.
So with this lens correction problem in mind with photos I've taken with my DSLR, I wanted to correct images with FFMpeg (what I know as the swiss-army-knife of manipulating video/audio streams). I also use DarkTable, which is nice software that can also apply lens correction. The thing is, I noticed that DarkTable uses the lensfun library to apply lens correction, but FFMpeg had a different filter which was hard to figure out since each camera and their lens are different. Lensfun happens to have a database of camera lenses which is used to apply the right parameters to lens correction software to apply to your image. And that was when I had the idea of implementing a lensfun filter for FFMpeg.
Creating the filter for FFMpeg
FFMpeg has a github mirror, but development is not done on that code forge.
FFMpeg uses a mailing list to submit and review patches to be included into
FFMpeg's repository. I realized I had to get a set up working such that I could
directly send patches with a git send-email ... to be reviewed since git
formats it in a way for easier review. The second hurdle was that FFMpeg is
primarily written in C. Well, not that bad of a hurdle for me since at the
time, C++ was my preferred language of choice. So I examined other filters in
FFMpeg's sources to see how a filter could be created, and worked onwards from
there. It's always hard to work on another person's/group's code-base as a
newbie to that code-base, so tools like cscope in vim helped tremendously
in figuring out where functions/variables were defined, and where such
functions/variables were used. When I got to a point where I felt familiar
enough to write a filter, I went ahead and researched the API for lensfun.
Lensfun
It's been a while since I wrote the filter for FFMpeg, but I do remember having to implement a Gaussian function (I think it was Gaussian) for some reason. Lensfun provided the parameters to apply lens correction, but it did not provide all of the needed functionality, which was why the Gaussian implementation was required. So I had to wrangle with both FFMpeg and Lensfun. I did eventually figure it out enough such that I could actually apply lens correction to images taken from my DSLR.
Review for the Lensfun filter
I overlooked a couple things when I submitted my first version of my patch that implemented a FFMpeg filter for using lensfun. There was a linter script and a formatter specification (either it was a script that formatted the code, or config to pass to clang-format to format the code, I forget which). It took to about several revisions before the patch was finally approved. Unfortunately, Lensfun is GPL3, so builds of FFMpeg with GPL3 enabled could only use it. But it was a nice accomplishment.
Takeaways from developing in FFMpeg
I always refer to the docs, API references, and whatever other documentation provided by the project if they existed. I would avoid asking questions unless absolutely necessary (yeah I'm kind of shy). One of the most important things for working on someone else's code is that you have to familiarize yourself with the process for submitting code, the code format standards, and being acceptable that your patch is not up to snuff and requires more revisions.
Anyways, the commit that implemented the filter can be found here.
Blender is a video editor?
So I would often turn to Blender for video editing, though I really aught to learn 3D modeling since that is a useful thing to know. Looked around and noticed that Blender leverages FFMpeg for rendering video. I then remembered that AV1 support is chugging along well, and I thought to myself, "what if I set up Blender to render to AV1 video?"
AV1 not AVI
AV1 is a recently new video format that is meant to be completely free of any kind of fees to use due to patents or something, and it seems that support for it is improving as time goes on. It is not to be confused with the AVI container, and it is a video format/encoding (like H264).
Getting Blender to use AV1
Fortunately for me, Blender already leverages FFMpeg for decoding and encoding
video (as mentioned earlier), so all that is needed is for some glue-code in
Blender to use FFMpeg to encode to AV1 (and decoding would work automatically).
The only issue is that Blender may not have the required dependencies to process
AV1, but I later found out that someone else in charge of Blender dependencies
would handle it after I submitted my patch. Once again, cscope in vim helped
tremendously in figuring out what does what in the C/C++ code.
Of course, similarly to FFMpeg, Blender and their developers have their own process of submitting and reviewing patches for Blender. It was well documented on how to get started, so reading most of their available guides was a great help in figuring out how to submit a patch in the first place, as well as other guidelines for submission/writing-up-the-patch.
Things falling into place after the initial patch submission
After my first submission, other developers offered corrections, questions, and guidance for the patch. I had to set up a script that uses VMAF (a way to calculate a "video quality score" comparison from an original video and a processed video file) to make comparisons such that the selected codecs had the expected quality results from encoding. Long story short, libaom_av1 was the balanced/ideal codec. Also, the submission of my patch got the ball rolling for adding libaom_av1 as a dependency to Blender. So once that got done, my patch could be merged in.
Takeaways from developing in Blender
The process for submitting and reviewing code for Blender was different than the email/mailing-list process for FFMpeg. It was nice to have a website UI for review, but I did have to install "arcanist" (it uses php interestingly enough) on my machine to submit the patch in the first place (and I also needed to register on their developer website). Once again, it is important to figure out how Blender's developers get work done before submitting anything which is why it is important to read the relevant documentation and submission guides.
If you want to see my patch, it's here.
End notes
So contributing to open source requires a significant amount of studying a
group's process before being able to help that groups' software. It also
requires some knowledge/experience on being able to work on an unfamiliar
code-base. Luckily for me, the code was primarily in C, and cscope + vim made it
easier to grok. Well, some others probably wouldn't say code being in C to be a
good thing, but I'm very familiar with C and C++ so that worked for me. The
public nature of open source software and contributing open source software is
neat. You just have to be competent enough to submit something that is of some
use. Meritocracy or something like that I suppose. And you have to follow the
rules of the project you're trying to submit to (for a more frictionless
submission). It was an interesting experience, and if I have more ideas to
implement in some open source software, I may try my hand again at submitting
another patch. Time will tell...
Forward
So the previous blog-post used firejail to restrict the access to the system. It turns out that openssh has the necessary stuff built in to do so without using firejail.
Setting it all up
User
You can set up a new user that your Android SSH client will connect to, or use an existing user. (You can use an existing user because you can restrict access by the key used, not only by user.)
authorized_keys file
When you add the public key to your .ssh/authorized_keys file, prefix the entry with options like in the following example:
restrict,port-forwarding,permitopen="127.0.0.1:6600",permitopen="[::1]:6600" <android client's ssh public key here>
The restrict option blacklists all capabilities, and port-forwarding enables the port-forwarding capability. The latter two permitopen entries allows access to MPD listening on port 6600 with either localhost IPV4 or localhost IPV6.
Note that you can prefix any public key entry with this to have the same restrictions to only allow access to MPD. You still will need to make sure your client can access sshd (like by configuring your firewall to allow accessing sshd).
If you want to access MPD from a PC with ssh, you may use something like:
ssh -i myKey -T -L 6600:127.0.0.1:6600 username@myMPDHost
That's It
I've been using this setup with a capable Android ssh client and the MALP app (from f-droid) to control mpd from an Android phone. Hopefully this will work just as well for you too.
EDIT:
I've found a better solution for this setup here.
Setting up Secure MPD Control from Android
This post documents setting up secure MPD control. You will be able to control MPD running on your host Linux system via an MPD client on your Android device. By using firejail, the client connection will be restricted to only accessing MPD, and cannot access the internet through the ssh connection.
Note that sshd configuration is not covered in this post, and it is expected
for you to know how to.
Requirements:
- Linux system running MPD
- firejail (userspace application that sandboxes the
jailuser's session) - OpenSSH (on both the host and the client)
- MPD client on Android device
Note it is expected that your system is using systemd.
Setting up the Host
Securing access
Creating the user to log into
Create a new user that uses firejail as its default shell:
sudo useradd -m -s /bin/firejail jailuser
Note we created the user that will accept ssh connections as jailuser. If you
use a different username, be sure to keep track of that as later parts in this
post refer to jailuser.
Creating the bridge interface
Create a systemd service that will start a bridge interface that the firejail instance of the new user will use:
Place the following snippet in /etc/systemd/system/jailuser_br.service
[Unit]
Description=Set up bridge interface for jailuser

[Service]
Type=oneshot
ExecStart=/usr/bin/brctl addbr jailuser_br
ExecStart=/usr/bin/ip addr add 192.168.2.1/30 dev jailuser_br
ExecStart=/usr/bin/ip link set jailuser_br up
RemainAfterExit=yes
ExecStop=/usr/bin/ip link set jailuser_br down
ExecStop=/usr/bin/brctl delbr jailuser_br

[Install]
WantedBy=multi-user.target
This oneshot service will create a new interface for the jail to connect to.
Note that we are using the 192.168.2.0/30 subnet, and assigned 192.168.2.1
to the host system. You will need to sudo systemctl daemon-reload after
creating the file to make systemd aware of it (unless you choose to reboot
first), then sudo systemctl enable jailuser_br to make systemd execute it on
every boot. If you want to create the interface now, do sudo systemctl start
jailuser_br.
Restricting the new user
Create the directory in jailuser's home that will have the firejail config for
the login shell (note jailuser by default cannot access this file).
sudo mkdir -p /home/jailuser/.config/firejail
Place the following snippet in
/home/jailuser/.config/firejail/default.profile:
1 2 3 4 5 6 7 8 9 10 11 12 13 14 15 16 17 18 19 20 21 22 23 24 25 26 27 28 29 30 31 32 33 34 35 36 37 38 39 40 41 42 43 44 45 46 47 48 49 50 51 52 53 | |
Note this snippet is a copy of /etc/firejail/default.profile except with a few
changes:
- added
net jailuser_brto connect to the bridge interface - added
ip 192.168.2.2to assign that ip address tojailuser's session - changed
netfilter /etc/firejail/dropallbutmpd.netto restrict the network in the session - explicitly set default shell to
/bin/bashsince without this set, problems can occur
Restricting the network in which the user has access to
Place the following snippet in /etc/firejail/dropallbutmpd.net
*filter
:INPUT DROP [0:0]
:FORWARD DROP [0:0]
:OUTPUT DROP [0:0]

#allow all loopback traffic
-A INPUT -i lo -j ACCEPT

# allow ping etc.
-A INPUT -p icmp --icmp-type destination-unreachable -j ACCEPT
-A INPUT -p icmp --icmp-type time-exceeded -j ACCEPT
-A INPUT -p icmp --icmp-type echo-request -j ACCEPT

# allow access to mpd
-A INPUT -p tcp --sport 6600 -s 192.168.2.1 -m state --state ESTABLISHED -j ACCEPT
-A OUTPUT -p tcp --dport 6600 -d 192.168.2.1 -m state --state NEW,ESTABLISHED -j ACCEPT

COMMIT
The dropallbutmpd.net file will enforce dropping of all connections except to
the host's MPD (at port 6600). If your MPD is listening on a port other than
6600, you will have to change that in the previous snippet. You may also have to
change the 192.168.2.1 if you are using a different local subnet and address
for the host. Right now, those two entries refer to the host's ip address in the
bridge interface.
Other configuration
Finally, if you have a firewall configured, you will need to allow connections
from 192.168.2.0/30 to the host at port 6600 over tcp. For example,
configuration for ufw can be used as follows:
ufw allow in proto tcp from 192.168.2.0/30 to any port 6600
Setting up the Client
As mentioned before, sshd configuration is not covered in this post, but you
are expected to have set up a key set up for an ssh client to connect to the
host with. The ssh client must be set up to forward local connections at 6600 to
192.168.2.1:6600, which is equivalent to something like ssh -L
6600:192.168.2.1:6600.
Prior to using your MPD client, you will need to access your host system with the ssh client and have port 6600 forwarded to the host. It is kind of inconvenient, but it is the price we must pay to secure the connection.
You will need to install an MPD client on your Android device. I've gotten this setup to work with M.A.L.P., which is available on the F-Droid app repository.
Make sure your MPD client has set up a connection to localhost:6600, including
the password that your MPD has been set up with if it is set.
Using the setup
Your host should have the jailuser user created, have configuration for that
user's firejail shell set up in
/home/jailuser/.config/firejail/default.profile, sshd should be configured
for that user, /etc/firejail/dropallbutmpd.net should exist and enforce the
restricted network, and the jailuser_br interface should be up.
All that's left is to connect to the host's sshd with the ssh client on your
Android device, and then open the MPD client to interface with the host's MPD.
When the client logs in as jailuser on your host, the session will log in with
the /bin/firejail shell (which isn't actually a shell but ends up running a
restricted /bin/bash session by default), which will automatically load the
profile in /home/jailuser/.config/firejail/default.profile and enforce the
restricted network for the session. The internet will be unavailable in the
session, and only connections to the host's ip (192.168.2.1) at port 6600 will
be available, which should be what your MPD on the host is listening on.
EDIT 2021-05-15
I discovered a better streaming solution, you can check it out here: https://github.com/zorchenhimer/MovieNight
Abstract
Using OBS-Studio (for streaming), VLC (client to view the stream), NGINX (RTMP server to serve the stream), and Vagrant (for easy setup of the server), anyone can stream from their computer for anyone to see.
Maybe you are paranoid about third-party screen-sharing services and want to roll your own screen-sharing service, or maybe you want to present something to a bunch of colleagues. Whatever the case, this setup should work well since a client only needs a program that can view an RTMP stream (in this case, VLC).
Requirements
- A machine with Vagrant to host the server
- Config provided by this site to setup the server with Vagrant (links in the "Setting up the server" section)
- (optional) Alternative config provided by git repo with more requirements for the server:
- git
- rsync
- OBS-Studio on the machine to stream from
- VLC (or other RTMP stream viewing program) to watch the stream
- (optional) ssh for port forwarding to the server machine (if serving on a machine different from the one that's streaming)
Setting up the server
Server files from git repository
Grab the config with git:
git clone https://github.com/Stephen-Seo/StreamingServer.git
# also get the required submodules
cd StreamingServer
git submodule update --init --recursive
Note that in the freshly created StreamingServer directory you will be using commands like vagrant up.
Server files from packaged zip/tar.xz
Grab the config here (zip) or here (tar.xz) and put it on the machine you want to host the RTMP server to serve streams.
Note if you don't trust the NGINX files in the config, you can grab the nginx source here and grab the RTMP module for NGINX here. After placing these files in the DebianRTMP directory containing the Vagrantfile and bootstrap.sh scripts, you may need to modify bootstrap.sh as the versions of NGINX and NGINX RTMP module may be different (and may extract to differently named directories).
unzip/untar the config and it should create a DebianRTMP directory with all the necessary config. You can place this directory anywhere, just note this is where we'll be using commands like vagrant up.
Notes about config
Note: The config (namely Vagrantfile) will set up the 192.168.5.0/24 local network. If this is already being used by something else, you will have to change it in the Vagrantfile and bootstrap.sh, and use the different ip address in later steps in this guide.
# Using 192.168.70.0/24 instead of 192.168.5.0/24
sed -i 's/192.168.5.3/192.168.70.3/' Vagrantfile
sed -i 's/192.168.5.0/192.168.70.0/' bootstrap.sh
First time running the server
Go into the StreamingServer (server files from git) or DebianRTMP (server files from zip/tar.xz) directory and run vagrant up.
This may take some time as it will grab a Debian stretch64 box if it isn't already downloaded by vagrant. Afterwards it will download several pacakges necessary to build a custom NGINX. Then it will build a custom NGINX (so that is is compiled with the RTMP module necessary for this to work) and install it. Some config will be overwritten by the bootstrap.sh script that will setup the RTMP server. Finally NGINX will be started as the last step of the provisioning process.
When done using the server, use vagrant halt and not vagrant destroy to retain what was downloaded on the server.
Not first time running the server
Go into the StreamingServer (server files from git) or DebianRTMP (server files from zip/tar.xz) directory and run vagrant up && vagrant provision.
The bootstrap.sh script was designed to not reinstall things already installed and to not compile NGINX again if it was already installed, so running the provision step again will just skip to running the NGINX server without need of ssh-ing into it.
Other notes regarding the server
Note that the server should have the 1935 port forwarded to allow incoming connections to view the stream.
Streaming to the server
Streaming to a server that is on the same machine as the streamer
Note that the server has been set up such that a local network 192.168.5.0/24 is whitelisted such that streams pushed through that network will only be accepted.
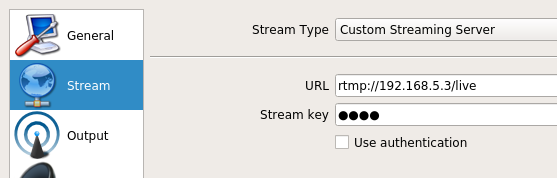
In OBS-Studio, click on the settings button, click on the Stream tab, and set the "Stream Type" to Custom Streaming Server. Then set the URL to rtmp://192.168.5.3/live. The stream key can be anything, but you will need to know the stream key when connecting to view the stream.
Streaming to a server that is on a different machine than the streamer
The easiest way to be able to send a stream to the server is to port forward using ssh.
ssh -L1935:192.168.5.3:1935 <server_hostname>
Then instead of setting the URL to rtmp://192.168.5.3/live in OBS-Studio, you will need to set it to rtmp://127.0.0.1/live.
It is possible to use port forwarding and/or firewall rules to allow access to the internal network, but this is discouraged. If this is done, anyone could stream to your server, thus using ssh is more secure.
Viewing the stream
Open up VLC and in the menu bar under "Media", click on "Open Network Stream" (or use the shortcut Ctrl + N).
The network URL should be set to rtmp://<server-ip>/live/<stream-key>.
If the server is on the same machine and if the stream-key is test, then the URL would be rtmp://127.0.0.1/live/test.
Note that the server should have the 1935 port forwarded to allow incoming connections to view the stream.
Conclusion
For the hoster, setting up the server and stream is a little complicated but is easier due to the use of Vagrant.
For the viewer, the only config needed is the URL of the stream.
If there are any questions, please feel free to comment and I will provide answers as another comment.
Thanks for reading, and remember to vagrant halt the server when it is no longer in use.
EDIT (as of September 2019)
I recently visited this area, and found that many of the restaurants have closed, including the one mentioned here. Thus, this post is no longer accurate regarding availability.
So there's this place called "On The Table" in Gyunggi-do, Seongnam-Si, Bundang-gu, South Korea.
(It's in a building called "First Tower". I'm sure if you Naver search First Tower in Korean you'll find it.)

It's got a wide selection of restaurants (that seem more like "booths") to choose from. My favorite "restaurant" is TomaTillo.

This place satisifies my hunger for Mexican food as they have a good selection of dishes.
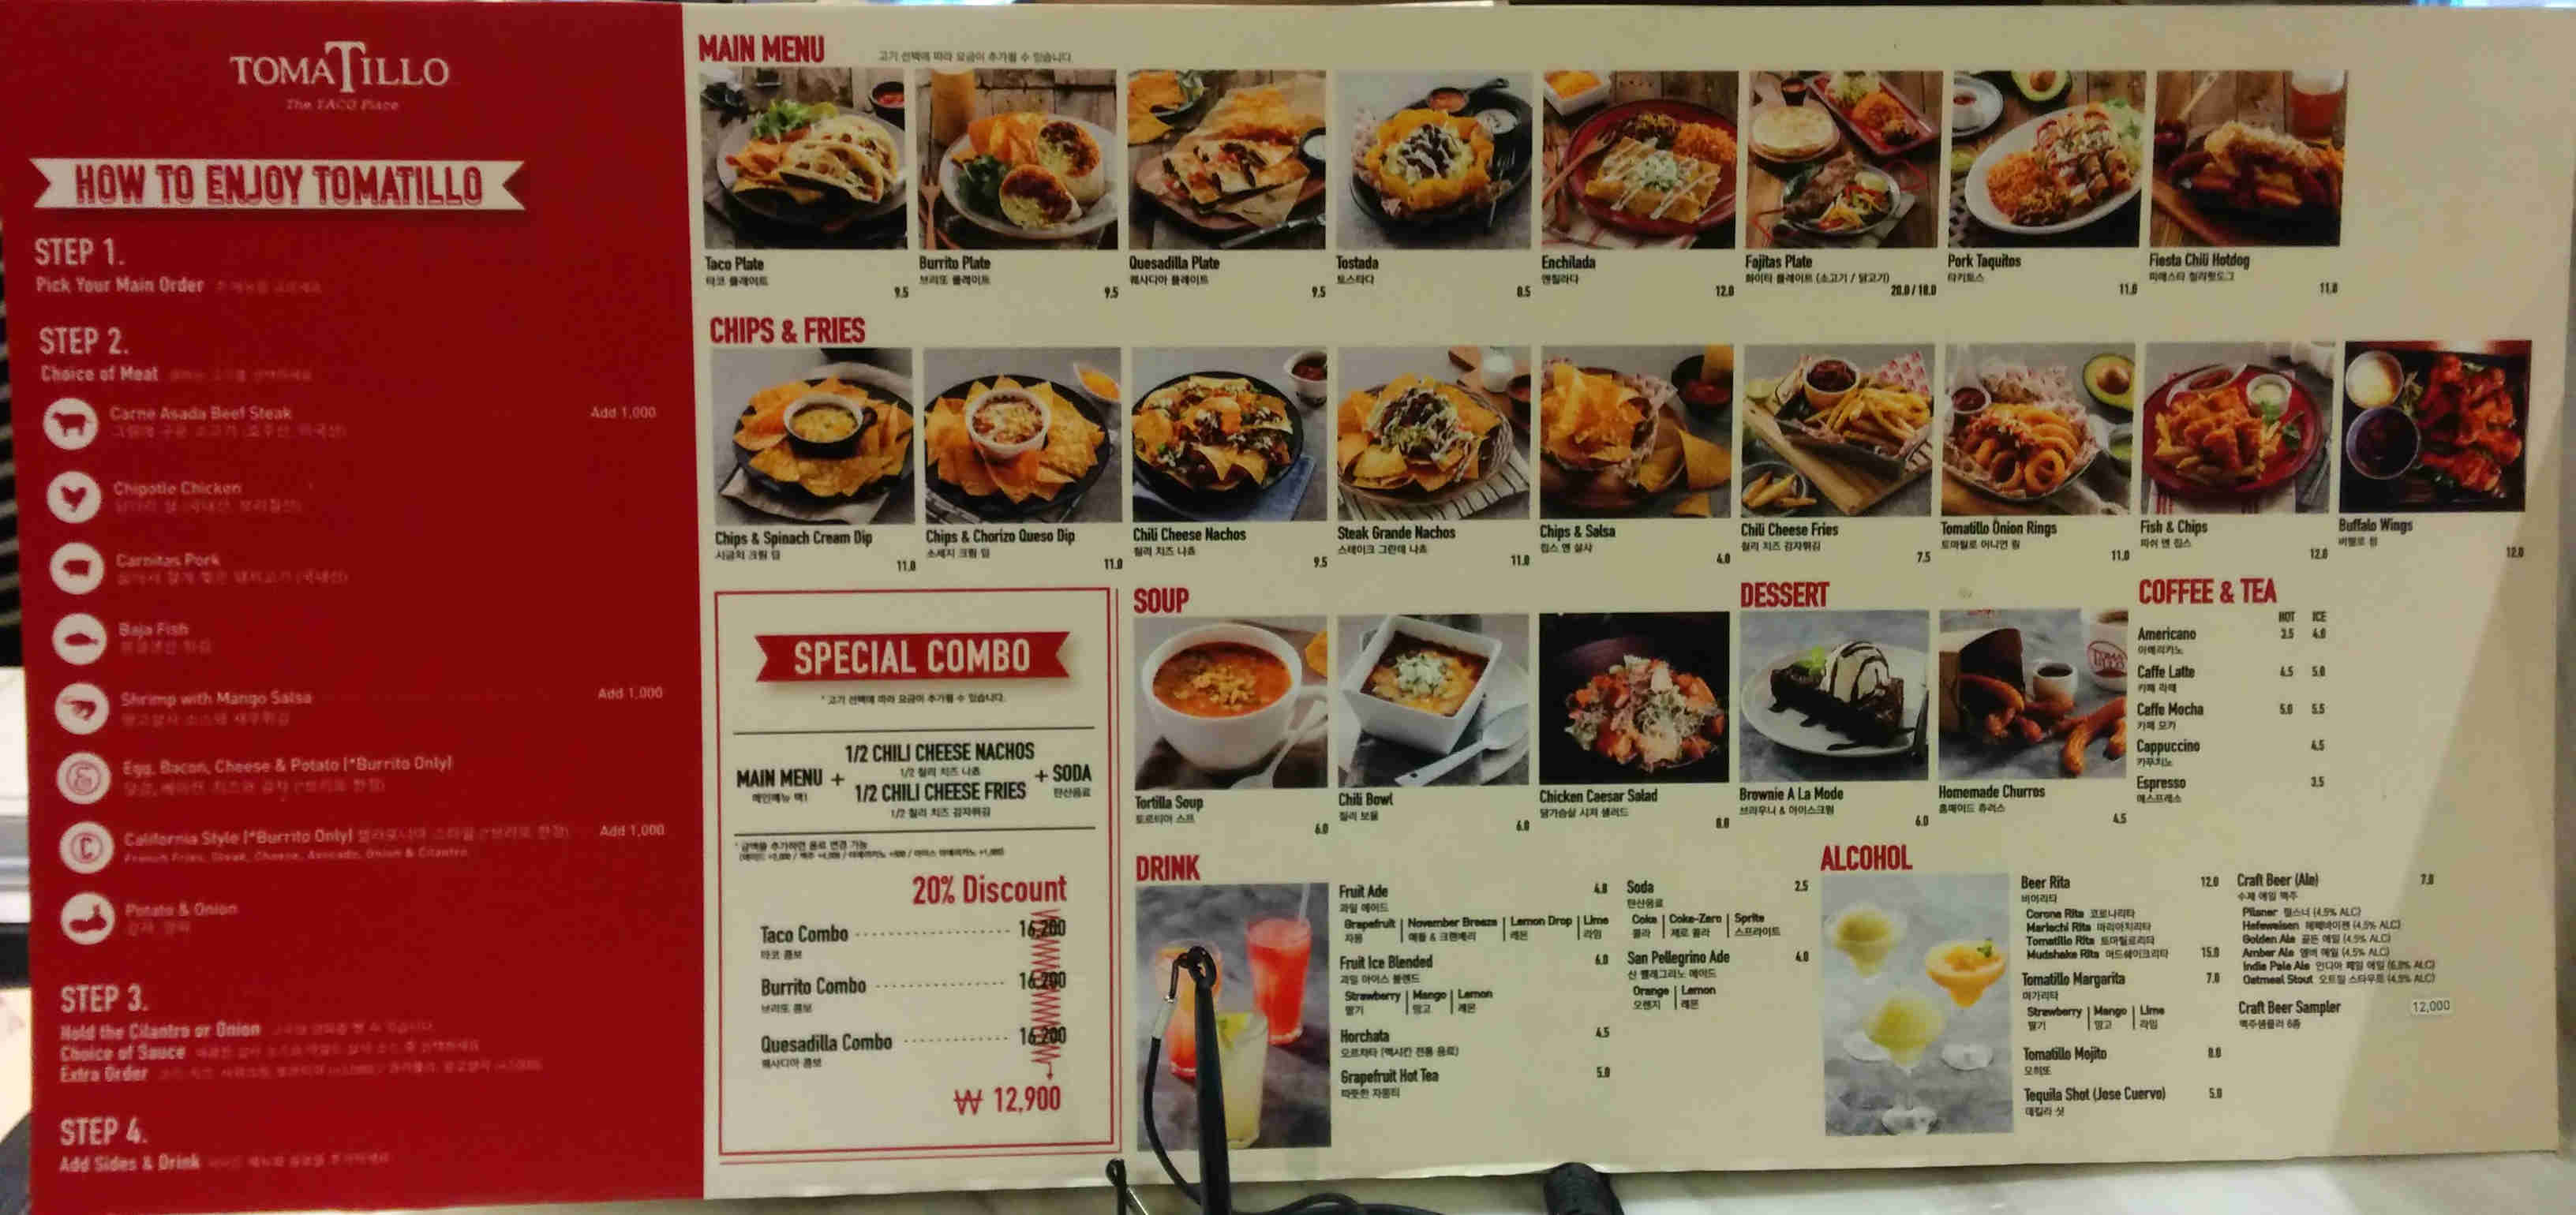
However, I usually get the burrito set/combo.

A spicy burrito plus chili-cheese-nachos sure hits the spot!

When I first started this website, I was using a simple webhost that was friendly and easy to use.

This blog post is simply an appreciation of the service provided by asmallorange.com, which was provided really cheap simple webhosting services that I used for a while.
Just got this website up and running on a new host.
And wow what a pain it was.
At the moment, Arch Linux images at gandi.net are broken. Updating forces you to first manually update package-query and yaourt or nothing can be updated. And even if you get that far, you're still unable to update because pacman isn't able to add new keys to pgp/gpg for some reason, which breaks the update system.
So this baby is running on Debian 8 and hopefully will remain secure and up to date.
Good to be here at last!